
Sections:
1. Databricks Documentation Links for creating DeltaSharing Recipients and Shares. Databricks documentation for OIDC federation
2. Instructions for configuring OIDC with ENTRA
3. Instructions for configuring OIDC with OKTA
Databricks specific documentation for Delta Sharing Recipients and Shares
Management of the data sets available within Exponam.Connect for a user is handled within Databricks Platform Delta Sharing configuration.
For detailed instructions on creating Unity Catalog Shares, Delta Sharing Recipients, and .share files, see the following Databricks documentation:
https://docs.databricks.com/aws/en/delta-sharing/create-share
https://docs.databricks.com/aws/en/delta-sharing/share-data-open
https://docs.databricks.com/aws/en/delta-sharing/create-recipient-token
https://docs.databricks.com/aws/en/delta-sharing/create-recipient-oidc-fed
*Note: Exponam.Connect version 25.2.x and earlier supports Delta Sharing v1 - sharing via bearer tokens. Exponam.Connect version 25.3.x and above support both Delta Sharing v1 (bearer tokens) and Delta Sharing v2 (Open ID Connect (OIDC) federation / OAuth2.0)
Configure OIDC Federation with Microsoft Entra:
- Add both Delta Sharing and Exponam.Connect as Enterprise Applications within your Entra Tenant.
***FOR DELTASHARING:
https://login.microsoftonline.com/<<tenantID>>/adminconsent?client_id=64978f70-f6a6-4204-a29e-87d74bfea138
***FOR EXPONAM.CONNECT: https://login.microsoftonline.com/<<tenantID>>/adminconsent?client_id=7cb1a547-eaf4-4d95-960b-b9fe4bdc9426
<<tenantID>> -- replace with the tenant in which the users reside (your tenant, for your employees)
*Note – if the user logging in for first time has admin permissions within the tenant, these Enterprise Applications may be added at time of first loggin.
2. Set up a Recipient record in Delta Sharing of Type=Open, OIDC Federation. Make sure you grant Shares for the recipient to access.
3. Add OIDC federation policies for the Recipient
- Use the tooltip values for both Issuer URL (https://login.microsoftonline.com/{tenantId}/v2.0) and Audiences (64978f70-f6a6-4204-a29e-87d74bfea138). In the Issuer URL, replace {tenantId} with the ID of the User’s tenant
- For Subject claim, use either oid (for an individual user) or groups (for an entra group of users)
- For Subject, use the object ID for either the user or the group, respectively
- For Audience, use the tool tip value for the Delta Sharing application ID (this value can also be found in your Entra console under Enterprise Apps)
4. Download the OIDC share file from the OIDC profile generation portal, rename the file to something appropriate, and send to the applicable Exponam.Connect users. (This portal URL can always be accessed by returning into the OIDC federation policy.
A walkthrough video of these steps is available via our youtube site:
Configure OIDC Federation with OKTA:
Use of Exponam.Connect with Okta for OIDC Federation requires you to contact Exponam (info@exponam.com) for an enterprise-specific installer. You cannot use our public installer with Okta. You may use our public installer to evaluate Exponam.Connect with V1 type share files (not using Okta).
The instructions which appear below are for use by organizations who are in direct communication with Exponam and have/are arranging for an enterprise-specific installer for their organization.
Create a new Application Integration within your Okta admin console
Sign-in method = OIDC-OpenID Connect
Application type = Native Application
<NEXT>
Name the application “myExponam.Connect” (or any other thing you would like)
Core Grant = Authentication Code
Sign-in Redirect URI= default AND Add additional URI: http://localhost:5000
(That exact localhost URI – http, not https)
Sign-out Redirect URI=default
Assignments – you can do this enterprise wide, or you can choose to limit to specified users / groups that will be using Exponam.Connect.
Federation Broker Mode= Enabled
<SAVE>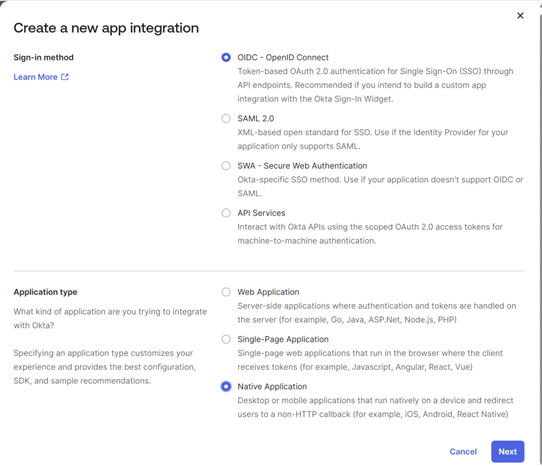
Provide Exponam with environment details
Once you have completed the Application Integration setup in step 1, send the Client ID value for the App Integration to support@exponam.com.
Install Exponam.Connect MSI
Exponam will provide your organization with a custom installer which will only authenticate for your Okta specified users with v2 share files. (You may still provide v1 share files which do not rely upon Okta for users if you wish.)
(You may proceed to Steps 4 and 5 before the Exponam.Connect application is installed on users' machines.)
Configure Delta Sharing Recipient and OIDC records
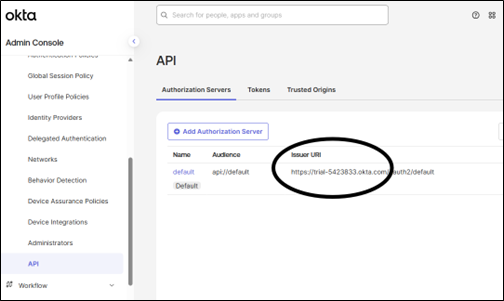
Using Default API Authorization Server
Set up a Recipient record in Delta Sharing of Type=Open, OIDC Federation. Make sure you grant Shares for the recipient to access.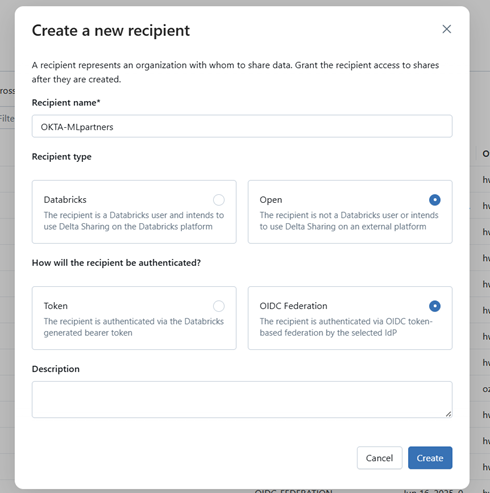
Add OIDC federation policies for the Recipient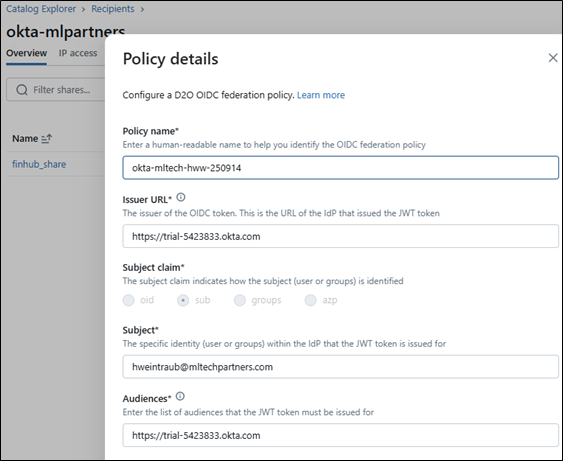
a. Provide a policy name.
b. Issuer URL – use your OKTA Issuer URI from your Authorization Server (e.g. if using default API Authorization Server ->https://myCompany.okta.com)
c. Subject claim - use either sub (for an individual user) or groups (for an Okta group of users)
d. Subject - use the OKTA username for SUB or the groupname for the groups, respectively
e. Audiences - use the existing default API Authorization Server Audience from your OKTA API Authorization Servers (Navigate Security -> API.) If using the default, the correct value is the beginning portion of the Issuer URI
Using a New Authorization Server
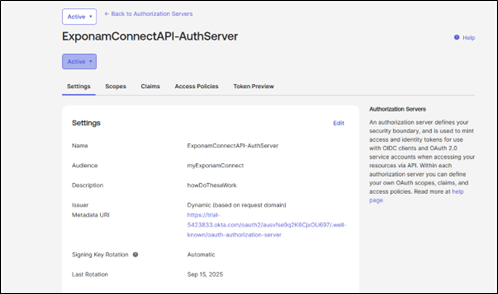
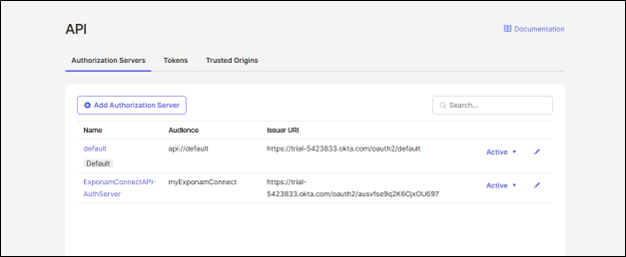
Create a new API Authorization Server. Give it an Audience name which will be associated with Exponam.Connect (this will be the Audience entered in the Databricks OIDC Federation setup). The new Authorization Server will be assigned a unique Issuer URI (this will be the Issuer URL in the Databricks OIDC Federation setup).
New API Authorization Server Setting
The new Authorization Server in the API Authorization listings
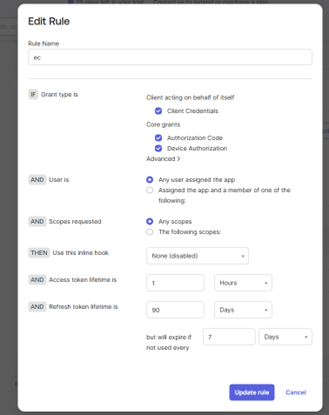
Go to the Access Policies tab of your new API Authentication Server. Add a new Access Policy. Add a new rule for the Policy. Accept the default values in the rule, or limit access according to your organization policies.
New Access Policy
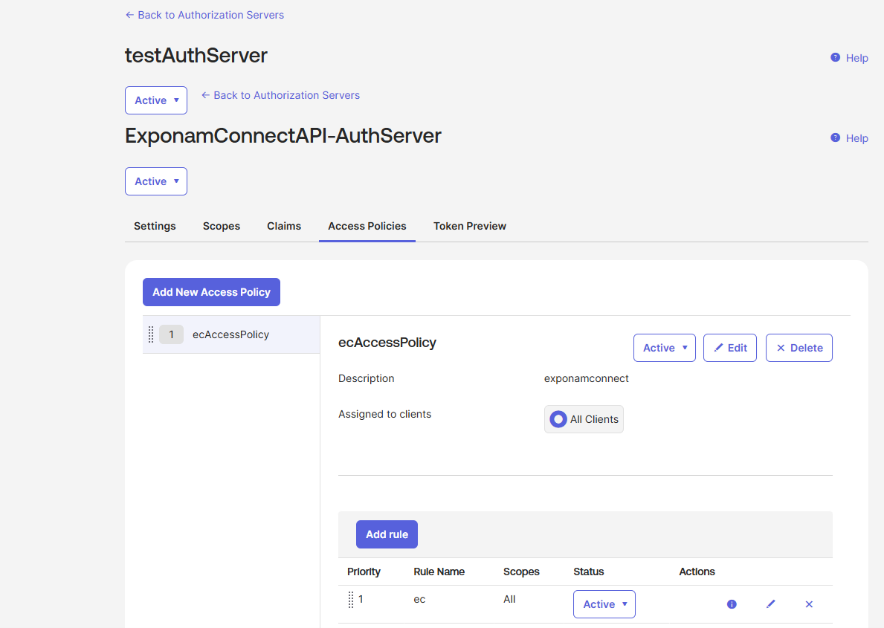
New Rule
Set up a Recipient record in Delta Sharing of Type=Open, OIDC Federation. Make sure you grant Shares for the recipient to access.

Add OIDC federation policies for the Recipient
- Provide a policy name.
- Issuer URL – use your OKTA Issuer URI from your newly created Authorization Server (i.e. use this for the example above -> https://trial-5423833.okta.com/oauth2/ausvfse9q2K6CjxOU697)
- Subject claim - use either sub (for an individual user) or groups (for an Okta group of users)
- Subject - use the OKTA username for SUB or the groupname for the groups, respectively
Add OIDC federation policies for the Recipient
- Download the OIDC share file from the OIDC profile generation portal and send to the applicable Exponam.Connect users. (This portal URL can always be accessed by returning into the OIDC federation policy.
 .
.