
Overview
Exponam Analyst Intelligence brings enterprise cloud data directly into Microsoft Excel. Business users can query, filter, and import governed data without writing code or leaving their spreadsheet. This guide covers everything you need to get started on Windows.
The add-in provides three ways to work with data, organized in the Excel ribbon:

The Exponam ribbon in Excel
- Analyst Intelligence (Get Data) — Query cloud data using SQL or natural language across Databricks, Snowflake, and Fabric endpoints.
- Analyst Intelligence (Model Serving) — Execute Databricks ML models directly in Excel cells.
- Delta Sharing (Import Data) — Browse and import Delta Lake tables using the visual data builder, with scheduled live updates.
System Requirements
- Microsoft Windows 10 or later
- Microsoft Excel desktop application (Microsoft 365 or Office 2016+)
- Internet connection
- One or more of the following, provided by your data administrator:
- A .share credential file for Delta Sharing access
- SQL endpoint connection details for cloud query access
- Model Serving endpoint URL and PAT for ML model execution
For Mac or browser-based Excel, see the companion Mac/Browser Usage Guide.
Download and Install
- Download the installer. From your Windows machine, download the setup file:
https://www.exponam.com/install
- Run the installer. Double-click setup.exe. If your machine or antivirus software prompts for permission, allow the installation to proceed.
A DigiCert code-signing certificate has been issued for Exponam.Connect for Excel. You can verify the certificate by clicking the Publisher hyperlink in the installer window.
- Complete the installation. Click Install when prompted. When finished, you will see an “Application Customization successfully installed” confirmation.
- Launch Excel. Open Microsoft Excel. A new Exponam tab will appear in the ribbon bar. Click it to access the Exponam toolbar.

 Installer windows: Publisher verified and Installation complete
General Settings
License Key
The add-in is free to install and use with limited capacity. If your organization has a license key, apply it by clicking License on the Exponam ribbon. Paste your key and click OK. The license window will confirm the licensee name and expiration date.
For license inquiries, contact info@exponam.com.
Preferences
Click Preferences on the Exponam ribbon to adjust application settings:
- Maximum rows per sheet — Upper limit for rows imported to a single worksheet.
- Maximum sheets — Number of sheets created when importing large datasets.
- Reset user hints — Re-enable instructional hint messages that were previously dismissed.
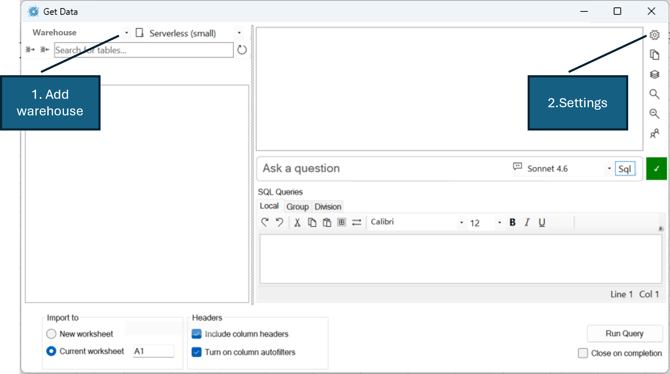
Get Data: SQL and Natural Language Queries
The Get Data feature in the Analyst Intelligence section of the ribbon lets you query cloud data using SQL statements or natural language. Results are returned directly to your Excel worksheet.
Supported Platforms
Databricks SQL warehouses, Snowflake, Microsoft Fabric, AWS Redshift, Google BigQuery, AtScale semantic layer. (These connections are constantly being rolled out and updated. Check the application connection options for current set.)
SQL Endpoint Configuration
To connect to a cloud warehouse, open the connection dropdown (top left of the Get Data window), select Add, and choose the type of warehouse you wish to connect.
Databricks
A Databricks workspace connection requires that you enter
- Your Databricks workspace URL
- A name for your connection
- A PAT (personal access token)* for connection. (not required if connecting via SSO)
Once you configure the connection, a list of available SQL warehouses will be populated. Select the warehouse you wish to use. The system will remember your choice until you select a different one.
Natural Language AI Configuration
Once you have configured at least one cloud warehouse, you can configure your Natural Language Configuration. You can download and use models locally or connect to a commercial provider like Anthropic.
Benefits of local models:
- No data or table schema is ever sent anywhere. Your data remains 100% local – you make a direct connection to your cloud data from your machine.
- No tokens or usage fees. Every interaction with a commercial model from Anthropic or OpenAI incurs token costs.
- You control what model you use and how you configure it to work. We provide model instructions for small, medium and large models. You can choose any, modify or create your own. We’ll offer suggestions on what model to used based on your computer, and what instructions based on your model.
Benefits of a commercial model:
- No matter how powerful your computer or how large a model you run locally, commercial models are vastly larger and more powerful. And commercial models are constantly being improved by the AI model companies.
- When running “large” models such as commercial offerings, the output includes not only the necessary query to run against your database, but also an clear language description which you will see in your Get Data chat dialog.
- Commercial models are the most likely to translate your natural language question correctly.
To configure your Natural Language AI Models for use:
- Click the gear icon (top right of the Get Data window) to open Settings.
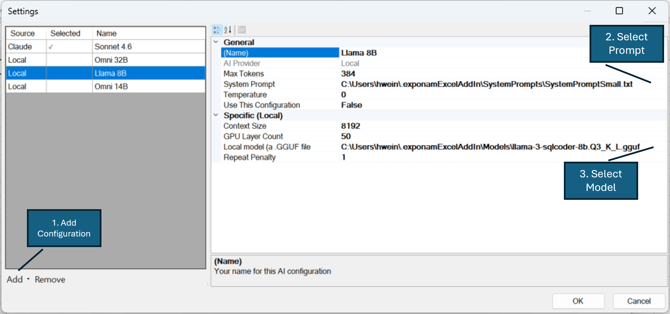
- Add or remove Local and Commercial model configurations. Select an existing configuration to update its settings.
- Select a system prompt. System prompts are stored on your machine in C:\Users\<yourname>\.exponamExcelAddIn\SystemPrompts.
- For local models, select your model on the GGUF line. You will need to download a model file to your computer.
The following table lists model options tested and optimized with the Exponam small and medium system instruction sets. You are free to use any model of your choosing. If your computer does not have a GPU, use a small (<10B) model. Depending on your configuration and GPU power, you can use larger models; 20–40B models run well with 24GB VRAM. The Exponam application verifies that these GGUF files from Hugging Face are untampered with before they are loaded and run.
|
Size |
# of params |
Name |
Download url |
|
Small |
8B |
llama-3-sqlcoder-8b-Q3_K_L.gguf |
|
|
Medium |
14B |
OmniSQL-14B.Q8_0.gguf |
https://huggingface.co/mradermacher/OmniSQL-14B-GGUF/resolve/main/OmniSQL-14B.Q8_0.gguf |
|
Medium |
32B |
OmniSQL-32B.i1-Q4_K_M.gguf |
https://huggingface.co/mradermacher/OmniSQL-32B-i1-GGUF/resolve/main/OmniSQL-32B.i1-Q4_K_M.gguf |
Suggested Configurations
|
Model Size |
System Prompt |
Max Tokens |
Temperature |
Context Size |
GPU Layer |
Repeat Penalty |
|
8B |
Small |
384 |
0.0 |
8192 |
50 |
1.0 |
|
12B-40B |
Medium |
512 |
0.0 |
8192 |
99 |
1.0-1.03 |
|
Large Commercial |
Large |
4096 |
0.0 |
n/a |
n/a |
n/a |
On workstations without a dedicated GPU with VRAM, performance with local models will degrade with increasing model size. Use the smallest model for best results. Executing against a commercial vendor will be just as fast regardless of workstation configuration.
While you are free to change parameter settings, we recommend keeping the defaults.
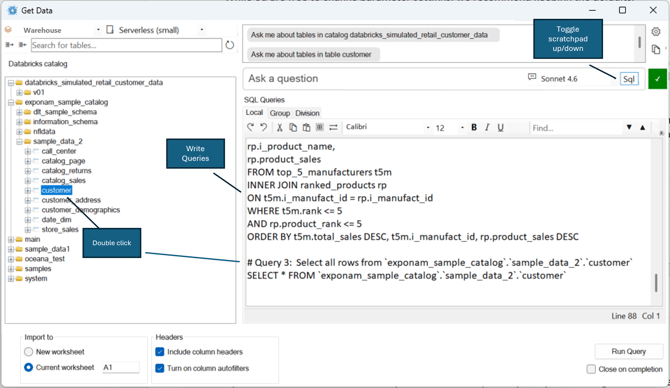
Using SQL Queries
Writing your own SQL queries or using shared queries does not require Natural Language AI configuration or model downloading. Select your cloud data repository and SQL engine, then enter your query in the scratchpad. Double-clicking any table or column in the Catalog tree automatically generates a Select statement in the scratchpad.
Your scratchpad persists between sessions. Organize your favorite queries as you choose. The “Jump to” feature navigates through your scratchpad when you use the standard comment notation at the start of each statement: # Query n:
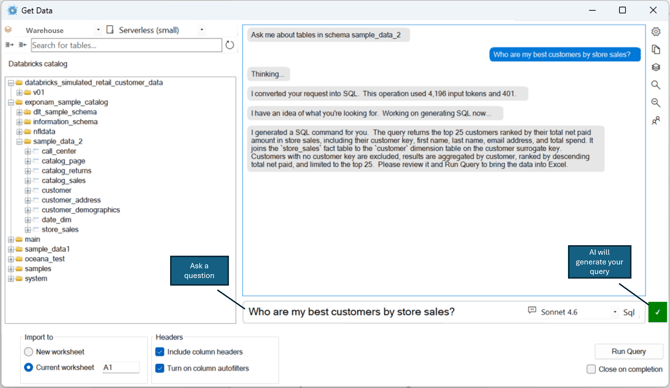
Using Natural Language Queries
Open the Get Data window. Select your cloud data repository and your SQL engine. In the Catalog tree on the left, select the table or group of tables from which you wish to generate a result. Type your question into the chat entry box.
Your conversation appears in the transcript window.
To view the generated SQL, check the SQL Query scratchpad at the bottom of the screen. Toggle the scratchpad open or closed with the button in the chat box.
Once a query has been generated, execute the query to return data to Excel by clicking Run Query or by responding Yes to running the query in the chat window (if prompted).
Import Data: Delta Sharing
The Import Data feature in the Delta Sharing section of the ribbon provides visual, no-code access to Delta Lake tables. Data access via Delta Sharing does not use compute resources or incur DBU charges.
Configuration
Adding Delta Sharing Connections
Your data administrator will provide one or more .share credential files containing the connection details for your Delta Sharing server(s).
- Click Import Data on the Exponam ribbon.
- In the Import Data window, click the Delta Sharing icon to add a server.
- Select your .share file when prompted. Repeat to add additional servers.
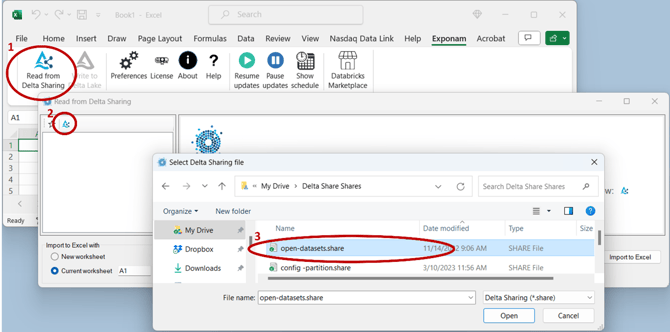
- The Share View (left panel) will populate with all tables you are permissioned to access, organized by share and schema. Click any table to preview its contents.
Connection details are retained between sessions. You do not need to re-add .share files each time you open Excel.
If no connections are configured, a sample Delta Sharing connection is available for trial use.
 Import Data window with Share View and Table View
Authentication
Delta Sharing supports two authentication methods, determined by the type of .share file provided:
- v1 share file (bearer token) — Authentication is embedded in the file. No additional setup is needed.
- v2 share file (OIDC federation) — Authentication is handled through your enterprise identity provider (e.g., Microsoft Entra, Okta). You may be prompted to sign in through your organization’s login page on first connection.
For enterprises using OIDC federation, IT administrators will configure the identity provider integration. See the Exponam.Connect Okta Authentication or Managing User Authentication and Access guide, available from your Exponam representative.
Filtering Data
Click the filter icon in any column header to apply a filter. Available options depend on the column’s data type:
- Text: contains, equals, starts with, etc.
- Numeric: equals, greater than, less than, between, etc.
- Date: relative ranges (Today, This Week, Last Month) or custom date ranges
After applying a filter, the column’s filter icon turns black. Click the eraser icon in the Table View header to clear all filters.
Quick Filter
Right-click any value in the data preview to instantly create a filter on that cell’s value. You can then refine the filter through the column’s filter icon.
Refreshing Preview Data
Click the refresh icon (top right of the data grid) to update the preview. Preview data may show a reduced set depending on your Delta Sharing server’s predicate hint support.
Column Selection and Arrangement
- Drag column headers to reorder them in the preview and in exports.
- Use the search box to find a column by name.
- Check or uncheck columns to include or exclude them from imports.
- Use the (+) and (–) buttons to select or deselect all columns.
- Toggle “Show all columns” to view all columns or only selected columns.
Saving Favorites
Click the star icon at the top right of the Table View to save your current filter and column configuration as a favorite. Saved favorites appear in the Share View beneath the table name. Click the star icon above the Share View to toggle between all tables and favorites only.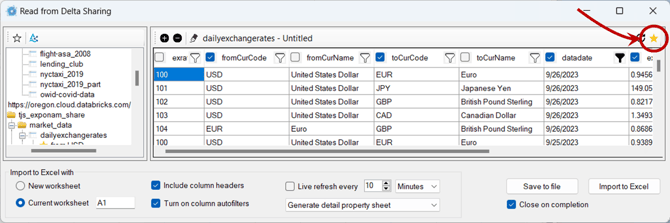
Importing to Excel
With filters and columns configured, choose import options from the Controls section at the bottom of the Import Data window:
- Destination — Import to a new worksheet or the current worksheet (data starts at the selected cell, default A1).
- Column headers — Include or exclude headers in the import.
- Autofilters — Enable Excel’s built-in table autofilters on the imported data.
- Properties — Include a metadata worksheet with server details, query parameters, extraction timestamp, and license details.
- PivotTable — Create a PivotTable on the data sheet or a separate sheet, with a selectable primary dimension.
Quick Import
Right-click any cell in a worksheet and select Import from Delta Sharing. All your tables and saved favorites are available for selection. Data imports immediately using the selected cell as the starting position, with your most recent import options applied.
 Quick Import via right-click context menu
Live Table Updates
From the Import Data window, enable automatic data refresh on a schedule ranging from seconds to days. After importing, check the status or modify the refresh schedule by clicking Show schedule on the Exponam ribbon. Use Pause and Resume to control updates.
If you save a workbook containing live tables and reopen it on a machine with Exponam.Connect installed, live updates resume automatically on their established schedule.
Model Serving: Databricks ML
The Model Serving feature lets you execute Databricks ML models directly in Excel, without any coding or Databricks knowledge.
Configuration
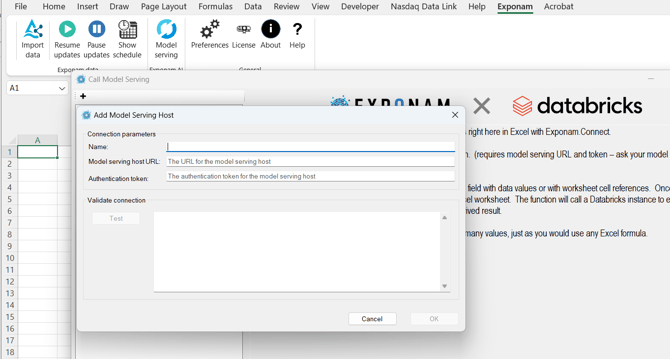
- Click the Model Serving icon on the Exponam ribbon.

- Click the (+) button to add your Model Serving endpoint URL and a personal access token (PAT).
Executing Models
- Open the model builder from the Model Serving
- The UI guides you to enter values or cell references for each required input parameter.
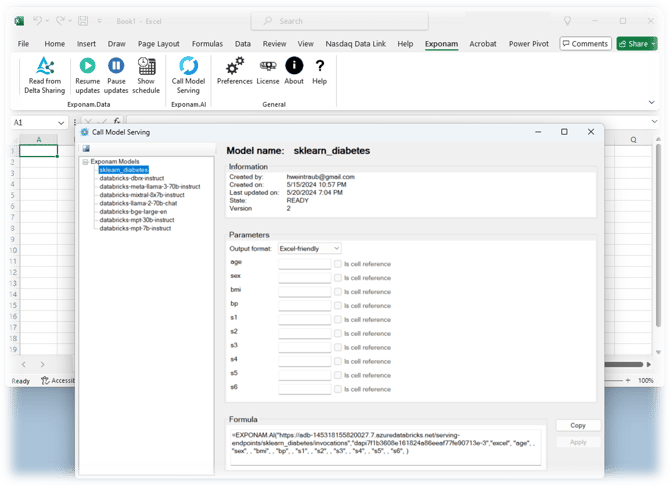
- Copy the resulting Excel function and paste it into any cell, or click Apply to insert it into the active cell.
- The function calls the Databricks Model Serving endpoint and returns the result.
Output Formatting
- Excel Friendly — Results in a single cell or array of cells.
- Verbose — Expanded result detail.
- Raw — JSON text for complex result sets.
Advanced users can bypass the UI formula builder and enter custom model functions directly into cells using the function template.
 Model Serving formula builder and model execution result
Click to download this as a pdf
Support
For questions, license requests, or technical assistance:
- Email: support@exponam.com
- Web: https://support.exponam.com
- License inquiries: info@exponam.com